Pause and queue one play
Use Pause when you want time to read the fight. Combat clocks freeze. Choose a legal card or ability and its target to queue one play. Resume to resolve it. The game checks the action again when you resume.
Reclamation: A Soul Unburied
Find out what runs on a clock, who takes a hit, and when to commit a card.
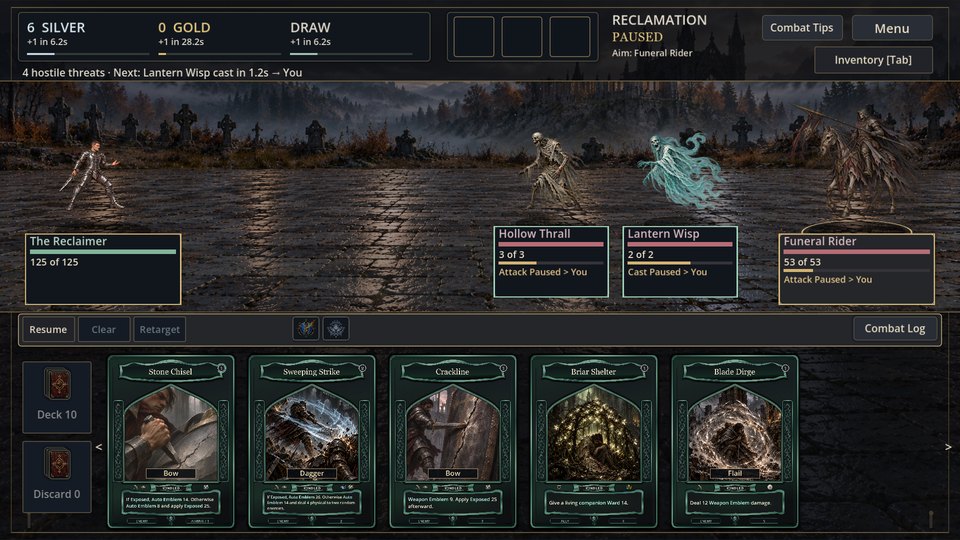
Tactical pause with Stone Chisel aimed and its legal targets visible.
Use Pause when you want time to read the fight. Combat clocks freeze. Choose a legal card or ability and its target to queue one play. Resume to resolve it. The game checks the action again when you resume.
Cards spend Silver. Most learned abilities spend Gold. In standard combat, you gain one Silver and draw one card every 8 active seconds on separate clocks. You gain one Gold every 30 active seconds. An effect such as Quickening can speed up all three while it is on you.
You can usually aim at the enemy leader while its summons are alive. When a card calls for a random target, the game picks it at resolution. The enemy leader’s basic attack normally goes to your first eligible frontline summon. Backline allies stay out of that route and can take enemy area damage.
Most statuses and Time Fracture steps use active seconds, so pausing gives you time to plan without using their duration. Stun stops action readiness from growing for the stated time. It leaves existing progress and prepared actions in place. Hamstring slows readiness. Clockscar lasts for a stated number of completed actions.
A spent card normally goes to discard. If you run out of cards to draw, the discard pile is shuffled back in. Fade keeps a card out of that ordinary recycle. Persist keeps a card in your hand for a limited time after its first play. Check the card for its replay limit and duration.
Living companions can gain Growth. Each new stack adds normal attack damage for that companion’s life and grants a small amount of Regen. Undead summons do not receive ordinary healing or Growth. Check the source before committing a heal or buff.
Pause the fight, then right-click a card in your hand to keep its inspection open. With the card focused, you can also press P, the default shortcut for Lock or unlock inspection.
Select a highlighted keyword to read its explanation. Use Page Up and Page Down to scroll a long inspection. Press Esc to close a keyword explanation, then press it again to close the card. You can also right-click the same card or select the close button.
To aim from the inspection, select Aim at a target and choose a legal target. While paused, a valid play is queued for when you resume. See how to change or clear a queued play.
The first play starts the Persist countdown. If the card stays in your hand, check its footer for the seconds remaining and, when shown, the number of plays left.
Pause to read the card's Replay instructions and check its Silver cost. Pausing freezes the countdown. A replay uses the time left on the original countdown. When the card reaches its play limit or the timer runs out, it leaves your hand.
Select the enemy you want to check, then hover over Ember Spear. Right-click the ability to keep its inspection open. To compare another enemy, select it and open the inspection again.
Read the damage in the spell description for the current cast. It includes your Mastery, equipment and, on forms that gain damage from Burning, the stacks already on the selected enemy. In Solar Needle Volley, the displayed total covers all three strikes.
Authored base shows the spell's starting values. Ward, mitigation and other effects can change how much Health the enemy actually loses. Check the Combat Log after the cast or see the Burning Spear branch for its base rules.
Pause combat and right-click Dreadbolt in your ability bar to keep its inspection open.
If your equipped Fractal restores Health, look for restore up to in the main preview. That amount includes your current mastery and equipment. The Authored base line shows the equipped form's healing before those bonuses. Dreadbolt restores Health after the strike, up to the Health you are missing.
While paused, you can change your mind before the queued play spends any resources.
When you resume, the game checks the queued play again before it resolves.
Each side shows one or two extra fighters on individual cards. At three living fighters besides you or the enemy leader, that side switches to a formation. Look above the fighters for Health bars and upcoming action timers. If the count drops to two, the individual cards return.
Hover over a fighter to inspect it. When a card or ability asks you to choose a target, select the fighter directly on the battlefield. You can select the enemy leader directly when the play allows it.
To find a specific ally in a formation, right-click the Allies heading to open Army. Combat pauses while it is open. Choose a member to inspect it or to select it for a play you are aiming. Closing Army returns combat to its previous pause state.
See how to read the enemy leader's action timers or browse Enemies & Encounters.
Look for Next at the top of the battle screen. Read the enemy name and action, the seconds until it is due, and the target after the arrow. Pause to check who needs protection before you play.
A tilde (~) before the time marks an estimate at the enemy’s current speed. The forecast can change if that speed changes. If you see Enemy action readiness halted, check the forecast again once enemy actions can advance.
For the leader’s support actions, check its Shield and Heal timers.
Hover over the enemy leader during combat to open Enemy Inspection. If the leader has a Shield or Heal row, check the timer under that action. You can pause first to give yourself time to read.
“Next in” estimates how soon the leader can use that action. Shield gives the leader Ward. Heal restores some of its missing Health. If Shield is close and you have a strong hit ready, you may be able to land it before the Ward goes up.
“Readiness halted” means the action timer has stopped advancing. When the timer resets, it shows the wait until the next use. Check the action row again before committing a card.
When combat asks you to discard a card, click the card in your hand or press its number. The fight waits for your choice while the discard countdown runs.
You have 45 seconds. Use tactical pause to stop the countdown if you need more time. If time runs out, the game discards the leftmost card in your hand.
When your hand extends past the screen, use the arrows at either end of the card row. You can also move the pointer over the row and scroll down to see cards farther right, or scroll up to go back. When keyboard focus moves to a card, the row scrolls to show it.
Pause first if you want time to look. If you still cannot find a card after checking the whole row, check your card piles.
Your equipped spells sit in the row just left of Combat Log. If the row is cut off, drag the thin scrollbar under the spell icons sideways to see the rest.
If the spell still doesn't appear, open Character between fights and check Loadout. You can equip the spell there or move it earlier in the row. See Arrange your battle loadout.
When a card is missing from your hand, check where it went before you plan your next play.
Select Deck during a fight to see what is still in your draw deck. Cards are listed alphabetically, so the first card you see may not be the next one you draw. Select a card to inspect it.
Select Discard, then use the Discarded and Faded tabs. When you try to draw from an empty deck, the discard pile is shuffled back in. Faded cards stay out of that shuffle. A card effect that retrieves Faded cards can bring them back.
In Deck, Discarded or Faded, open the rarity menu to narrow the list. If you see No matching cards, choose All to see the whole pile again.
A count like x2 groups copies with matching state. Copies of the same card can appear separately if their state differs. Select a card to check any notes about that group, such as whether the copies are protected. The detail shows the catalog cost. A conditional cost or damage that depends on the target is worked out when you play the card.
Select Back to cards to return to the pile.
Opening a pile pauses the fight. Select Close to return to the pause state you had before opening it. If Deck or Discard is unavailable while you are targeting or making a card choice, finish that choice or cancel targeting first.
Pause first if you want time to review a hit. Select Combat Log during a fight. Opening it leaves the fight running if you have not paused.
Find the hit and check how much damage reached Health and how much Ward absorbed. Hover a highlighted name or status for details, or click it to keep the details open. Select Close to return to the fight.
Pause the fight and open Combat Log. Move keyboard focus to the log text with Tab, then press Down to open details for the first highlighted entry. Use Up and Down to move through highlighted names, actions and statuses. The details stay open as you move through them. Press Esc or select Close to return to the fight.
Check the timestamp when you inspect a character's Health or Ward. Those numbers were recorded when the event happened. For current values, close the log and check the combat display. See how to inspect active combat statuses.
After you win a fight, Unbroken Reserve automatically restores some of your missing Health. Look for Unbroken Reserve in the victory rewards to see how much you recovered.
Win in under 10 active seconds to recover up to 30% of your maximum Health. For every full 10 seconds of combat, that amount drops by 5 percentage points. At 60 seconds or more, Unbroken Reserve restores 0 Health. Time spent paused does not count.
Your next fight starts with the Health you have when you enter. If you are still wounded after a win, check whether you can Rest at a shrine before taking on another fight.
Pause the fight and hover over a status icon on a combatant to read its details. Debuffs sit on the left and buffs on the right. If a row has more icons than you can see, scroll over that row with the mouse wheel.
Use Shift+Tab to reach the icons by keyboard. Press Enter or Space on a focused icon to open its details. Press Esc to close them.
Check the tooltip for timing. When an icon groups several timed applications, its countdown can show when the next application expires. See the Status Effects reference for effect definitions.
Pause and hover over the Ward icon to see how much protection each grant has left and when it expires. The number beside w is your total Ward. The small number on the icon counts separate grants. The countdown shows when the next grant expires.
For example, if the details show 12 Ward with 3 seconds left and 8 Ward with 14 seconds left, you have 20 Ward now. If you take no damage and gain no more Ward, you will have 8 left after the first timer runs out. Hits spend the oldest Ward first. Adding Ward gives you a separate timer.
See how to open status details with the keyboard or check the Ward glossary entry.
These definitions come from the game’s inspection text. Check the individual card for source-specific values and exceptions.